
As I have a little daughter, I’ve become a fan of Strawberry Shortcake,
Lillifee, My Little Pony, and of course, Hello Kitty. This tutorial will help you create a piece of fan art, totally dedicated to Hello Kitty. I adore this cute little kitten!
If, by some horrible mistake, you still don’t know who Hello
Kitty is—check out the official website.
Hello
Kitty is a little explorer of fun and joy, and she is always creative
and a game lover. That’s why I decided to present her with candy cart
and balloons—a little scene at the amusement park. As always, we will
use basic shapes and warp effects to complete this scene.
Can’t wait to start with you!
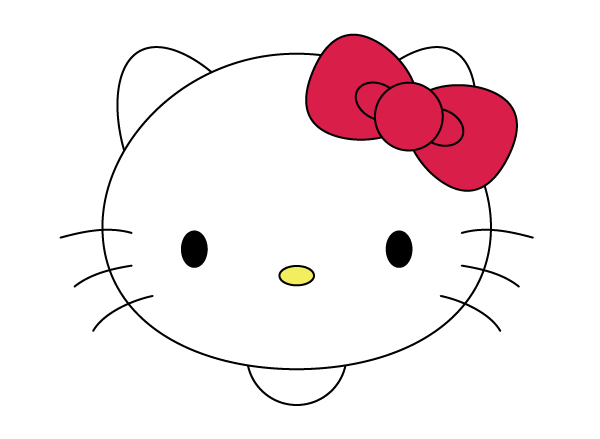
1. Drawing the Head and Face
Step 1
After creating a new document (Control-N), we will draw the head of our
little kitten. Take the Ellipse Tool (L) and draw an ellipse with white
fill color and black stroke. Now, go to Effect > Warp > Arc. In
the new dialogue window, enter the options you see in the image below:

Step 2
To achieve the perfect shape of the head, we still need to warp a little
more. Go to Effect > Warp > Arc, and enter the options:

Step 3
Now the head is ready, so let’s add two eyes. With the help of the
Ellipse Tool (L), draw two ellipses with black fill color and no stroke.
Then again, choose a black stroke color and yellow (R=245 G=237 B=96) fill color, and draw a nose.

Step 4
Now we will draw the ear. Make sure that you still have a white fill color
and black stroke color; using the Ellipse Tool (L), draw an ellipse.
Take
the Direct Selection Tool (A) and select the right and left anchor
points. Shift them down a little bit, and you will get an egg shape. Remember
this simple movement for your future projects—for example, when you
create something with an Easter theme.

Step 5
But now let’s return to Hello Kitty. Rotate the ear you created
in the previous step to the left, and place it as shown below. Do not forget to place
this ear behind the head (Control-X, Control-B).
Keep the ear selected
and take the Reflect Tool (O); while holding the Alt key, click the
middle of the face. You just created a reflection of the ear. In the new
dialogue window, check Vertical, Angle 90 degrees and press Copy. Move
the right ear to the right side of the head.

Step 6
Delete the fill color and look at the Stroke panel. Check off Round Cap.
Then using the Pencil Tool (N), draw three whiskers on the left side of
the face. Keep the whiskers selected and hit the Reflect Tool (O). Make
a vertical reflection as you did before with the ears.
If you’re not
familiar with the Pencil Tool (N), you can use the Line Segment Tool (\)
for drawing the whiskers and then move the handles using the Direct
Selection Tool (A) to achieve the result you want.

2. Creating the Bow
Step 1
Keep the black stroke color and choose the fill color R=218 G=30 B=74.
Create a circle. Using the Direct Selection Tool (A), select the top and
bottom anchor points and shift them to the right. That is the left part
of the bow.

Step 2
Draw one more circle as shown in the image below. Then make a vertical
reflection of the left side of the bow to create the right side of the
bow, just as you did for the ears and whiskers.

Step 3
Placing two ellipses between the middle circle and the left and right
parts of the bow will complete the whole bow. Group it (right-click > Group).

Step 4
Place the bow on the right ear of the kitten.

3. Creating the Dress
Step 1
Let’s start with the neck. Draw a circle under the head with white fill color and black stroke.
Step 2
Now take the Eye Dropper Tool (I) and click on the bow. You will get the
same red color. With this color, you need to draw a dress. So take the
Rectangle Tool (M) and create a rectangle, and then enter the options you see
below:

Step 3
And warp it again:

Step 4
Place the dress under the neck of the kitten.

4. Creating the Legs
Step 1
To create the leg, we will start from an ellipse. You should already
know which tool to use to create this! Now, take the Direct Selection
Tool (A) and click directly on the stroke, and you will see handles. Move them to achieve the result which you see in the image
below. After that, make a vertical reflection to create another leg.

Step 2
Put the legs in their place.

5. Creating the Arms
Step 1
We will need a rotated ellipse and a little circle to make the arm.
Select these two shapes and on the Pathfinder panel (Window > Pathfinder), press the Unite
button.

Step 2
Place the arm on the left side of the body, but under the dress. Then make a vertical reflection to create another arm.

6. Creating the Candy Cart
Step 1
Change the fill color to R=245 G=237 B=96, click the Rectangle Tool (M)
and draw a rectangle. Add a narrow pink rectangle on the bottom (fill
color R=247 G=170 B=188). Return to the previous yellow fill color and
using the Rounded Rectangle Tool, add a small rounded rectangle. Place it
behind the two previous rectangles (Control-X, Control-B).

Step 2
Let’s draw the wheel now. Create two circles, a small one over the bigger
one, and set the fill color to R=163 G=165 B=16. Go to the Pathfinder
(Window > Pathfinder) panel and press the Exclude button.

Step 3
Add a small circle in the middle. To place it exactly in the middle,
select all the circles and on the Align panel (Window > Align) press
the Horizontal Align Center and Vertical Align Center buttons.
Then
delete the fill color and draw a line using the Line Segment Tool (\). Place this line behind (Control-X, Control-B).
Keep it selected and
press the Rotate Tool (R), and at the same time press the Enter key on
your keyboard. In the new dialogue window, enter Angle 45 degrees and
press Copy. Keep pressing Control-D on your keyboard to repeat the last
movement. Stop when you have filled the wheel.
Group the whole wheel (right-click > Group).

Step 4
Place the wheel on the cart.

Step 5
Now we will draw decorations for the candy cart. Using the Eye Dropper Tool
(I), take the fill color from the wheel and draw a small circle. While
holding down the Shift and Alt buttons, start moving the circle. You
should get two circles. Then keep pressing Control-D until you have a
line of circles.
After that, delete the fill color and with any
stroke color, draw a rectangle exactly the way it is shown in the image
below. Select this rectangle and all the green circles. Press Crop in
Pathfinder.
Keep your result selected, because now we need to clean it.
Go to Object > Path > Clean Up. Be sure that all fields are
checked and press OK. And finally, using the Eye Dropper Tool (I), take
the same color from the wheel.

Step 6
Position this decoration as shown in the image below. Add two pink vertical rectangles (R=247 G=170 B=188).

Step 7
Let’s draw the handle. A tiny yellow rectangle (R=245 G=237 B=96) and a
rounded pink (R=247 G=170 B=188) rectangle will create the handle.

Step 8
Let’s place a roof on the candy cart. Start with white fill color and
black stroke and draw a rectangle. After that, delete the stroke color
and change the fill color to R=218 G=30 B=74.
Draw a rectangle like the one in
the image below. Duplicate it by holding down Shift-Alt and moving
it to the right at the same time, as we did before. Press
Control-D a few times. Make sure that the red rectangles are in the middle of
the white one. Select the whole thing and group it (right-click >
Group). Go to Effect > Warp > Arc and enter the following options:

Step 9
Take the green decorations you made for the candy cart before, make another
copy and attach it to the roof. Then change the fill color of the
decoration to alternating red and white. Use the Eye Dropper Tool (I) to
set the right color.

Step 10
Place the roof on the top of the candy cart. Voila! it is ready!

7. Creating the Ice Cream
Step 1
One large orange circle and three little circles at the bottom will help us
start creating our ice cream. The fill color is R=250 G=166 B=52. Select
all of them and in Pathfinder, press Unite.

Step 2
Let’s move on to the cone. Keep the black stroke color and create a
triangle. First, set the fill color to R=187 G=129 B=59, and then take the
Polygon Tool and click on your art board. In the new dialogue window,
make 3 Sides and click OK. The radius doesn’t matter.
By making a
Horizontal reflection, reflect the triangle upside down and stretch it a
little. Now we need to make rounded corners. So go to Effect >
Stylize > Round Corners. In the new window, enter Radius 10 px and
click OK.
Let’s concentrate on the Appearance panel. Click on the
tiny triangle on the top right corner and in the pop-up menu, select
Add New Fill. Now look at the Swatches panel. Go to Swatches >
Patterns > Basic Graphics > Basic Graphics_Textures and select the
Diamond pattern for this new fill. Set the Opacity to Soft Light.

Step 3
Make few different flavors of the ice cream by combining different
colors of scoops with cones. I chose blue (R=164 G=215 B=244) and green
(R=163 G=165 B=16) colors.

8. Creating the Cotton Candy
Step 1
After you’ve created a circle (R=183 G=0 B=80), go to Object > Path >
Add Anchor Points. You will get four more anchor points like in the
image below (the second circle). Then go to Effect > Distort &
Transform > Pucker & Bloat and set the slider to 13%.

Step 2
Add a tiny, narrow rounded rectangle using the Rounded Rectangle Tool
(fill color R=187 G=129 B=59). And one more piece of cotton candy with a lighter
pink color (R=247 G=170 B=188). But they shouldn’t fly in midair,
right? So let’s add a stick—with a yellow (R=245 G=237 B=96) rectangle.

9. Placing the Ice Creams and Cotton Candies on the Candy Cart
Put all the elements in their places. Or position them as you like!

10. Creating a Jar With Lollipops
Step 1
Set the fill color to R=164 G=215 B=244 and draw a rounded rectangle.
Add one more on top. Then draw an ellipse behind them and a small circle
on the top. The jar is ready!

Step 2
For our lollipop, draw a pink (R=247 G=170 B=188) circle and a narrow
rounded rectangle, as you did for the cotton candy. Add a new fill
as you did for the ice-cream cone (Swatches > Patterns >
Basic Graphics > Basic Graphics_Lines and select the 10 dpi 50%). Set
the Opacity to Overlay.

Step 3
Make different flavors of the lollipop by changing the fill color. But
be careful here: on the Appearance panel, you need to select the bottom
layer and just change that, not the fill with lines. I chose hot pink
(R=198 G=0 B=111) and orange (R=250 G=166 B=52).

Step 4
Now put the lollipops in the jar.

Step 5
Place that jar on the candy cart.

11. Creating the Balloons
Step 1
Draw a blue ellipse using the Ellipse Tool (L), and set the fill color to
R=164 G=215 B=244. Take the Direct Selection Tool (A), select the
left and right anchor points, and move them down. Create a circle on
top, much bigger. We just created a balloon!

Step 2
Using the same process, create two more balloons of different colors. I
chose R=245 G=237 B=96 for the yellow one and R=247 G=170 B=188 for the pink.

Step 3
Place all the balloons close to the candy cart. To create a string for the balloons, we will use the Line Segment Tool (\). Choose that tool
on your Tools panel and draw a line. Take the Direct Selection Tool (A)
and, by moving the anchor points and handles, stretch this line: one end
to one balloon, the other to the candy cart.
Then draw another line and
move one anchor point to the balloon, and the other to the candy cart. Repeat
this with the last balloon. Don’t forget to place all the strings behind
the balloons (Control-X, Control-B).

12. Placing It All Together and Creating the Background
Step 1
Group Hello Kitty for convenience (right-click > Group), and place her close to the candy cart.

Step 2
Draw a square for the background, with the fill color R=253 G=234 B=237
and at size 600 px in width and height. Be sure that the background
is behind everything (Control-X, Control-B).

Step 3
Add a new fill to the background as you did for the lollipops and ice cream
cones (Swatches > Patterns > Basic Graphics > Basic
Graphics_Dots and select the 6 dpi 20%). Set the Opacity to Soft Light.
You’ve done it! The illustration is now ready!

Conclusion
Hooray! Today’s was a huge job, but you’ve made it. If you didn’t like Hello Kitty before, I hope you will now.

